Manually exporting orders every morning gets old quickly. Export OrderPro's Automations feature lets you define a schedule and a report configuration once, then have the file delivered to one or more email addresses automatically — daily, weekly, monthly, or on any interval you choose. Setup takes about ten minutes; after that your reports arrive without any manual action.
Why automate order report delivery
Automated order report delivery removes two recurring failure points: the need for someone to manually trigger each export, and the risk of human error from the wrong date range, filter, or recipient. The schedule fires at the configured time, queries your live Shopify order data, builds the file, and delivers it. No one needs to be at a desk, and no one needs to remember which report goes to which team.
Common use cases for automated order report delivery include:
- Warehouse fulfilment lists — a daily email at 07:00 containing only unfulfilled paid orders, sent to the fulfilment team before the day's picking starts.
- Accountant revenue summaries — a weekly or monthly export of paid orders with financial columns mapped to the names your accounting software expects.
- CRM and marketing sync — a periodic customer email and purchase history export uploaded into your email platform or CRM for segmentation.
- Supplier order feeds — a daily export filtered to orders containing a specific product or vendor, sent directly to that supplier.
- Management dashboards — a Monday morning summary of the previous week's orders sent to stakeholders who do not log into Shopify Admin.
Before you begin
Each automation requires a report design (which columns to include) and optionally a filter (which orders to include). If you have not yet created these, set them up first in Manager → Report Designer and Manager → Filter Editor. See Getting Started with Export OrderPro for a full walkthrough of both.
1. Create a new automation
Go to Automation in the sidebar and click New Automation. Give it a descriptive name — for example Daily Fulfilment List, Weekly Revenue Summary, or Monthly CRM Export. Descriptive names help you manage the list as it grows.
2. Choose the report and filter
Select an existing report design from the dropdown. The design controls which columns appear in the exported file and what those columns are named. Then optionally attach a filter to narrow which orders are included. Leave the filter field empty to include all orders in the scheduled date window. If you need to build vendor-specific or operator-driven filters first, see Shopify Order Filters Explained for a full guide to native filters, post-processing filters, and the !, *, and !* operators.
Matching report and filter to the destination
Confirm that the column names in your report design match exactly what your warehouse management system, accounting package, or CRM requires for import. Fixing a column name mismatch is quick in the Report Designer, but catching it after a week of failed imports wastes time.
3. Set the schedule
The schedule editor controls when the automation runs and which orders it includes each time it fires. Getting this right is the most important part of the setup — a misconfigured date window means orders are either missed or double-counted across runs.
Frequency options
Available frequencies are: Hourly, Every 2 hours, Every 4 hours, Every 8 hours, Every 12 hours, Daily, Weekly, and Monthly. For most operational workflows — fulfilment lists, revenue summaries, CRM exports — Daily, Weekly, or Monthly are the right choices. Sub-daily frequencies are useful for high-volume stores that need near-real-time order feeds.
Date window
The date window is always relative — it refers to the period ending at the moment the automation fires, not a fixed calendar range. This means you configure it once and it always covers the correct period.
- Daily automations — use Yesterday or Last 24 hours. Yesterday covers the previous calendar day. Last 24 hours covers the 24-hour window ending at the time the automation fires.
- Weekly automations — use Last 7 days or Previous week. Previous week covers Monday to Sunday of the prior calendar week, which is typically what accountants expect.
- Monthly automations — use Previous month for accounting and CRM exports that need a clean calendar-month slice.
Scheduling tips
- Schedule daily fulfilment exports 30–60 minutes before your warehouse team starts their shift, so the pick list is waiting in their inbox when they arrive.
- Schedule weekly accounting exports on Monday morning so your accountant has the previous week's data at the start of their work week.
- Stagger multiple automations to the same recipient by a few minutes so the inbox receives distinct, identifiable emails rather than a simultaneous batch.
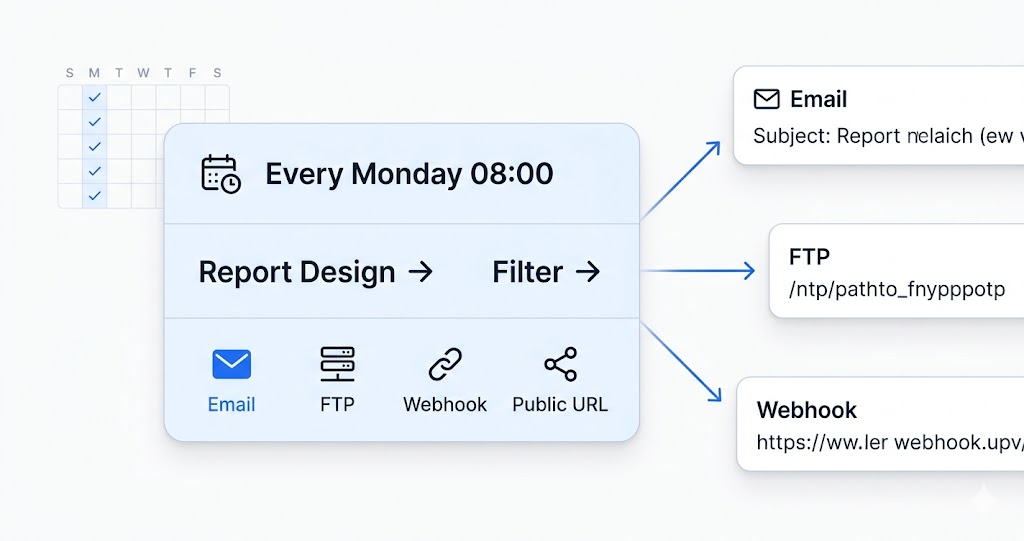
4. Configure delivery
Each automation delivers its report to one destination. Choose the one that fits your workflow — you can always change it later without affecting the schedule or filter.
Enter one or more email addresses in the Recipients field (comma-separated). Each recipient receives the same email with the export file attached or as a download link. You can set a custom subject line and an optional message body that appears above the file — useful for adding context such as the date range covered or import instructions. If different recipients need different data slices, create separate automations with different filters.
FTP
Provide your FTP server credentials and the target directory path. Each run uploads the file directly to that location, making it available to back-office systems, ERPs, or shared file servers without any manual intervention.
Webhook
Enter a URL and choose the HTTP method (POST or GET). Export OrderPro will call that endpoint on every run, allowing you to pipe reports into services like Make (Integromat), IFTTT, Zapier, or your own API for further processing.
Public URL
Export OrderPro generates a stable public link that always serves the file from the most recent run. Share it with a team, embed it in a dashboard, or use it as a data source in another tool — the link never changes, only the content it serves.
File format per automation
Each automation can use a different file format (CSV, Excel, XML, or HTML) regardless of your global default. Set it to match what the destination system or recipient expects — CSV for automated import scripts, Excel for human-reviewed reports, XML or HTML for custom integrations.
5. Activate and monitor
Toggle the automation to Active and save. The first run will occur at the next scheduled interval. The automation runs on the server regardless of your session state — you do not need to stay logged in.
The History tab
Every automation has a History tab that records every past run. For each run you can see the exact time it fired, the date window applied, how many orders were included, the generated file (available for download), and delivery status. The History tab is the first place to check if a recipient reports not receiving an export.
Pausing and reactivating
Toggle an automation to Inactive at any time to pause it. History is fully preserved and reactivating resumes the schedule from the next interval without any loss of configuration.
Common patterns
| Automation | Schedule | Date window | Delivery / format |
|---|---|---|---|
| Daily fulfilment list | Daily at 07:00 | Yesterday | Email to warehouse team, CSV |
| Weekly revenue summary | Monday at 08:00 | Previous week | Email to accountant, Excel |
| Monthly customer export | 1st of month at 06:00 | Previous month | CRM upload, CSV |
| Supplier product feed | Daily at 06:30 | Yesterday | Email to supplier, CSV (one per vendor) |
| Management weekly snapshot | Monday at 09:00 | Last 7 days | Email to stakeholders, all columns |
Frequently asked questions
What happens if the automation fires and there are no orders in the date window?
By default, Export OrderPro skips the delivery entirely when the date window returns no orders. The run is still recorded in the History tab as skipped with the note "No orders matched — empty report skipped", so you always have a full audit trail.
If you need delivery even when there are no orders — for example to confirm to a downstream system that no activity occurred — enable the "Export report even if it has no orders" checkbox in the automation settings. With that option on, an empty (header-only) file is generated and delivered as usual.
Can I send the same automation to multiple recipients?
Yes. Enter multiple email addresses comma-separated in the Recipients field. All recipients receive the same email and attachment simultaneously. If different recipients need different data, create a separate automation for each.
Can I run an automation manually outside of its schedule?
Yes — each automation has a Test button that triggers an immediate run using the last date window. The result is recorded in History just like a scheduled run, so you can verify the report layout, filters, and delivery settings are correct before the next scheduled fire. Note that you cannot pick a custom date range with this button; it always uses the same window the automation would use on its next run.
What is the Test button for?
The Test button is designed to let you verify your automation settings end-to-end — it runs the automation immediately using the last date window and delivers the file exactly as a scheduled run would. Use it after making changes to your report design, filters, or delivery settings to confirm everything looks correct. It is not a way to export a specific date range on demand.
How do I export a one-off date range without changing the automation?
Use the Reports page for on-demand exports — it lets you choose any date range and report design without affecting any automation's configuration.
Will the automation catch up on missed runs if it was paused or suspended?
Yes — if an automation was paused by you or suspended due to an error, Export OrderPro will back-fill all missed date windows in sequence once you re-enable it. Each skipped period is run in order until the automation is fully caught up.
There is one important exception: if you edit the automation before re-enabling it, the next date window is recalculated from that point forward. Any windows that were missed before the edit will not run — they are permanently skipped. If catching up on those periods matters, re-enable the automation first, let it finish back-filling, and then apply your changes.
What delivery destinations are supported?
Export OrderPro supports four delivery destinations per automation — you can choose whichever fits your workflow:
- Email — send the report as an attachment or a download link to any email address, with a custom subject and message.
- FTP — upload the file directly to an FTP server at a path you specify. Useful for feeding reports into back-office systems or shared file servers.
- Webhook — POST the report to any URL, including services like IFTTT, Make (Integromat), or your own API endpoint, for further automation.
- Public URL — make the latest report available at a stable public link that always points to the most recent run. Share it with a team or embed it in a dashboard.
Next steps
With automations running, the next area to explore is refining your filters for more specific workflows — vendor routing, refund exclusions, and dynamic date matching. See Shopify Order Filters Explained for a full guide to post-processing filters and the !, *, and !* operators.